
Write us to: sales@volgsol.com


When we talk about creating customized agent statuses and capacity rules in Zendesk, the first thing that comes to your mind is turning the omnichannel on, which is responsible for such major features. Without an omnichannel, you can not create custom statuses and capacity rules. That is a currently updated feature presented by the Zendesk authorities. Here we will see the detailed information about turning on omnichannel in Zendesk.
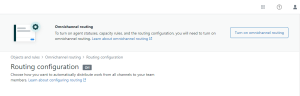
How to turn on omnichannel in Zendesk?
Navigate to the following steps to turn on the omnichannel:
Admin Center > Objects and rules > Omnichannel routing > Routing configuration.
1. Click on the button, Turn on Omnichannel routing.
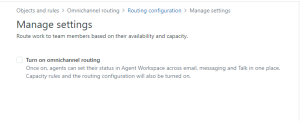
2. Click the checkbox Turn on omnichannel routing on the next page, Manage settings.
3. Here, you will see the number of steps you have to do for turning on the omnichannel, as below.
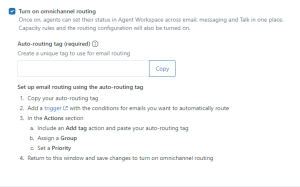
4. Create a Tag in the field as shown above and copy it to the clipboard because it will be needed for further steps.
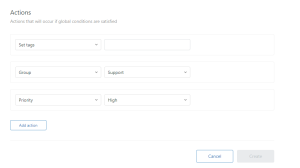
5. Click on the trigger link and set the Actions as described below and as in the above picture’s 3rd step, like
- Add the Tag you currently copied (A reminder that will show you that omnichannel is working correctly).
- Assign a Group.
- Set a Priority.
6. After creating the trigger, return to the current window and Save it.
Here the Omnichannel is turned on, and you are ready to create custom agent statuses and capacity rules.
Note: Live chats will not be routed to other groups and agents if the omnichannel
routing is turned on.
For further queries regarding the Turning On Omnichannel in Zendesk, please leave a comment below.


