
Write us to: sales@volgsol.com

What is a Webhook?
A webhook sends an HTTP (Hypertext Transfer Protocol) request to a specified URL in response to an event, such as a trigger or automation firing in Zendesk Support. Webhooks are used to integrate with third-party services.
When a ticket meets specified conditions, webhooks work with the help of automations and triggers in Zendesk Support. Webhooks can result in HTTP responses from third-party services that are not supported by Zendesk.
How to create a webhook?
Follow the navigation path that will take you to the webhook page.
Admin Center > Apps and integrations > Webhooks. Click Actions and select Create webhook.
Two steps should be performed for the integration of the webhook with Zendesk.
1. Defining the Webhooks
2. Link Triggers or Automations with webhook
Let us discuss how to define webhook and link it to triggers and automations.
1. Defining the Webhooks:
1.1 Give the Name of the webhook that must be understandable.
1.2 Give a short Description of the webhook. It is the short but vivid explanation of webhook, that is optional.
1.3 Give the Endpoints URL. It includes your subdomain name and endpoint URL that will describe what type of data you want to pass through the webhook.
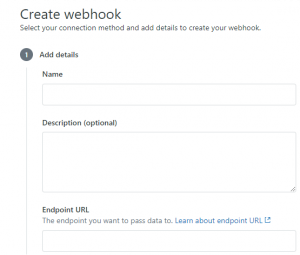
The most important thing is that you must consult Webhook Endpoint Documentation before adding the endpoint URL.
1.4 Now, select the request method from the drop-down. It includes PUT, DELETE, PATCH, POST, and GET methods depending upon your work and what you want to achieve.
1.5 Select request formats that are JSON, XML, and Form encoded mostly JSON format is used in Zendesk.
![]()
1.6 Select Basic authentication from the options.
1.7 Basic authentication will reveal two fields as below:
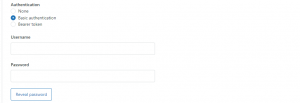
Put the Username and Password of your account in it.
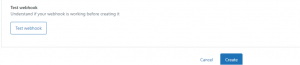
1.8 If you want to test webhook you can, otherwise, click on the button Create. All the settings you have applied will be saved.
Here you have created the webhook, and now the next step is to link it to trigger and automation.
2. Link Triggers or Automations with webhook
2.1 Link Triggers with webhook:
Follow the path that will navigate to the triggers page.
Admin Center > Objects and Rules > Business Rules > Triggers
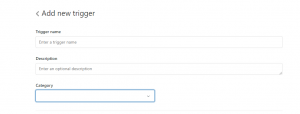
a. Click on the Add Trigger button.
b. Give the Name of the trigger.
c. Give a short Description of the trigger that can explain the trigger. It is optional.
d. The next step is to add the trigger to a pre-built category or to a new trigger category.
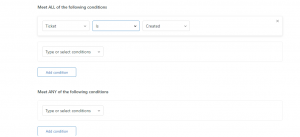
e. Define all conditions that must or may be fulfilled, in Any and All type conditions, but one thing is compulsory that keep the Ticket is Created.
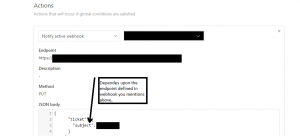
f. Add actions such as Notify Webhook. Select the webhook you want to use, and here all the information in the webhook mentioned above will be displayed. You can select the JSON body format from the available placeholders or you can write it manually according to the webhook endpoint URL.
g. You can also add further actions and click on the Create button.
Here the webhook is created and linked to the trigger.
2.2 Link Automation with webhook:
Follow the path that will navigate to the automation page.
Admin Center > Objects and Rules > Business Rules > Automations
Select the following steps to link automation with webhook.
a. Create new automation or edit an existing one by hovering your mouse pointer over the options icon in front of automation and clicking Edit.
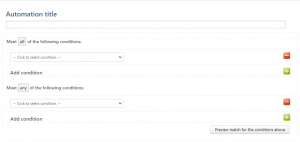
b. Give the automation Title.
c. Add the conditions in ALL and ANY type conditions, as we have done in triggers previously.
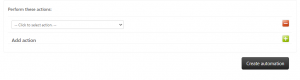
d. For automation, click the Add Action icon under Perform these actions. Select Notifications: Notify webhook and then select your webhook. Click Create automation.
Here we have linked automation with webhook to get third-party services from Zendesk that it personally does not support.
For further queries related to webhook, please leave a comment below.


