
Write us to: sales@volgsol.com

What is an IVR?
IVR stands for (Interactive Voice Response). When a customer calls a company for a problem-solving purpose, it helps in contacting that customer with the right agent. We can say that its purpose is to connect calls with the correct person who can serve the customer.
For example, when a customer calls an internet company to complain about an issue, an IVR executes when the helpline number is dialled. The helpline asks the customer to press a specific button related to the issue. For a Signal Issue, Press 1 and for Package issue, Press 2. Then the call is transferred to the particular agent.
How to create an IVR system:
Navigate to the following path:
Admin Center> Channels>Talks and Email > Talk
1. First of all, you have to purchase a Line/Number by going into the Lines tab.
2. Press the button named Add Line.
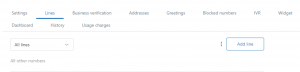
3. As you click on Add line button, select the option Purchase a new number, and a number will be given to you.
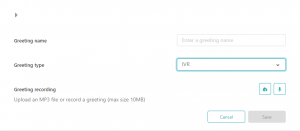
4. Select the Greetings tab and create a new greeting by pressing Add Greeting button.
5. A form will be displayed to you. Fill it, upload or record the greetings, and keep the Greeting type as IVR. Now, Save it.
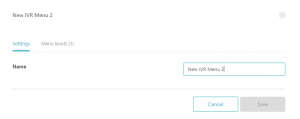
6. Now, click on the IVR tab, press the Add Menu button, give the IVR menu Name and Save it.
7. Select the IVR menu level.
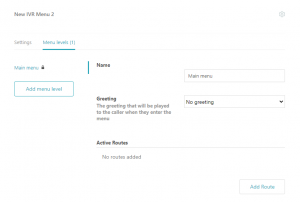
8. Give the Name of the levels.
9. Add Greeting here.
10. Press Add Routes (It describes the routing actions performed on a customer’s call), Save it.
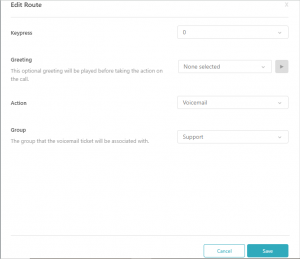
11. Add the Keypress, Greetings remains empty, add the Action on the base of your requirements, and add the Group to whom you want to route the call.
12. Now, Save the Main IVR tab.
The IVR menu is created and ready to execute.
For more queries related to IVR menu, please leave a comment below.


