
Write us to: sales@volgsol.com

What are fields?
Fields are the spaces used in the ticket forms to get information from the customer about their problems. Fields can be created on both the agent and customer sides.
For example, if you are working for an online food delivery business, you have to create its fields to get orders from the user, like, Food type, pieces, address etc. For such purposes, fields are created.
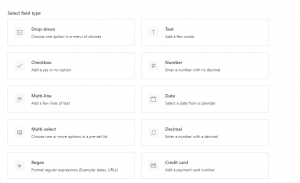
There are ten types of fields that Zendesk supports.
1. Drop-down (Choose an option from the menu)
2. Text (Add some words)
3. Checkbox (Yes or No option)
4. Number (Enter number without decimal points)
5. Multi-line (Add some lines of text)
6. Date (Add date)
7. Multi-select (To select multi options at a time)
8. Decimal (Add numbers with decimal points)
9. Regex (Add data in URLs type)
10. Credit card (Add credit card number)
How to create fields?
Navigate to the following path for field creation:
Admin Center > Objects and rules > Tickets > Fields
1. Navigating to this path, you will be shown all the fields. Select the Field type.
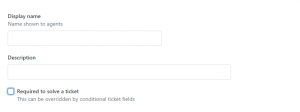
2. As you select the type, you will be given a new form. You have to give the Name, a short Description and enable the option Required to solve the ticket on your requirements.
3. Now, select the Permissions for this field.

4. Based on Permissions, put the information below and Save the field.
Here, a field is created on your permissions.
For further queries regarding fields, please leave a comment below.


