
Write us to: sales@volgsol.com

If you have a lot of users to add, it is troubling to add them one by one. This process will be time-consuming. To avoid such trouble, add users in bulk amounts. CSV files can do this.
What are CSV files?
CSV stands for (Comma-Separated-Values). CSV file contains such data that is separated by commas. These are the files like spreadsheets or excel sheets that are formatted in table form.
Adding users to the Zendesk account using CSV files:
In Zendesk huge amount of users can be added only through CSV files. Let us see how to create a CSV file for Zendesk’s users, adding purpose.
Creation of CSV file for Zendesk:
Add the following Columns to the CSV file:
1. Name (User’s full name)
2. Email (User’s email id)
3. External_id (Users such id if he has. It must be unique.)
4. Details (It includes users’ details like address or other custom details)
5. Notes (notes include extra data it is not)
6. Phone (it includes phone numbers. It should be unique)
7. Shared_phone_number (This is not compulsory and can not be used to identify the user)
8. Role (Describe the roles of users, i.e., agents, admins, customers(end-users))
9. Restriction (Restrictions are: agents, light agents, groups, organizations, requested and none)
10. Organization (The organization name where the current user will be added)
11. Tags (Add tags and separate them with commas)
12. Brand (If your account has multiple brands, the user will be added to that mentioned brand, give the subdomain name of the brand)
13. Custom_fields.
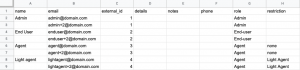
Here the CSV file has been generated and is ready to be imported on Zendesk.
Importing CSV file on Zendesk account:
Navigate to the following path:
Admin Center > People > Bulk actions > Import users
1. Select the option you want to do:
A. Create new users:
Select the option if you want to import new CSV data because those users do not already exist in your account.
B. Update existing users:
If you want to update existing users’ data, select this option and continue.

2. Include external ID in CSV output file:
Enabling this option will include external_id and email address in the result file when user records are created or changed. Must enable it if you used external_id.

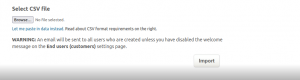
3. Choose the Select file button or Let me paste in data instead link for importing data in that link.
4. Press the Import button, the file will be imported, and an email will be sent to all users who are added yet.
Here, a list of huge users is added to to account with their role, name and restrictions.
For further queries related to CSV file and adding bulk amount of users, please comment below.


Thank you for your sharing. I am worried that I lack creative ideas. It is your article that makes me full of hope. Thank you. But, I have a question, can you help me?