
Write us to: sales@volgsol.com

Ticket statuses show the working progress of agents on a ticket in Zendesk Support. Ticket statuses give us a hint of how the requests of customers are treated by the agents. There are some default ticket statuses in Zendesk Support, such as Open, Pending, On Hold, and Solved. However, whenever we need extra custom statuses, it is easy to create the custom statuses, and also easy to edit the default statuses. Let us see how to create new ticket statuses.
How to create ticket statuses?
Navigate to the following path in Zendesk Support.
Admin Center > Objects and rules > Tickets > Ticket statuses.
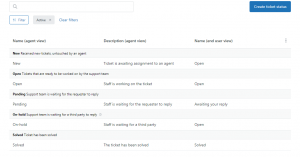
1. Here are all the statuses, either default or custom. You can edit them by clicking on the options icon.
2. To create a new status, Click on the Create ticket status button.
3. Choose the Category of status you are creating.
4. Give the Name and Description to see on the agent side.

5. If you want to show these statuses to customers, then enable the checkbox Show to end users a different view, and provide the Name and Description of that status you want to show to on the customers’ side.

6. To keep this status active, enable the Set as active checkbox and click on the Save button.
![]()
Here the custom ticket status is created and activated. It will be visible on the bottom right of the ticket page and also to customers in their responsive email notifications. Moreover, it is the update made by the Zendesk authorities. Before this, it was not possible to create custom ticket statuses.
For further queries regarding Custom Ticket Statuses in Zendesk, please leave a comment below.


