Write us to: sales@volgsol.com

Groups are the collection of multiple agents with the same qualities or abilities to solve a specific type of request or ticket. We can say that it is a agents’ skill-based collection. Groups may be of two types public groups in which tickets are accessible to the agents outside of that group. In contrast, private groups are the agents’ groups where agents from outside do not have access to tickets specified to that private group. This type is only for enterprise systems. It was all about the groups; now, let us see how to create groups.
How to create groups?
Navigate to the following path:
Admin Center > People > Team > Groups.
1. You will see a Default group created by the Zendesk system. You can also add team members to it by pressing the edit button.
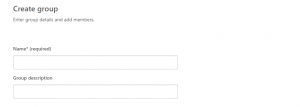
2. For a new group creation, press the Create group button.
3. Give the Name of the group that is required necessarily.
4. Give a brief but vivid Description of the group. It is optional.

5. If you want to set this group as the default group, select the Set as default group in the checkbox.
![]()
6. A list of your account’s agents and admins will be displayed below. Select the team members you want to add to this group who have the same capabilities to solve specific problems of users.
7. Press the Create group button. Here your group is created and ready to operate.
![]()
For further queries regarding Zendesk groups, please leave a comment below.


