
Write us to: sales@volgsol.com

Automated actions are tasks or actions that automatically occur at the time of execution but differ little from the triggers. These actions occur only once for leads, deals, and contacts events. Automated actions do not need any conditions it requires only events. We can say that it streamlines your Sell workflow and reduces the team members’ manual work. A team member with admin privileges can create these tasks. Let us see how to create automated actions.
How to create automated actions?
Navigate to the following path:
Settings > Business rules > Automated actions.
1. Click the Build your first action button on the navigated page.
2. Specify the trigger event on which you want to apply automated actions.
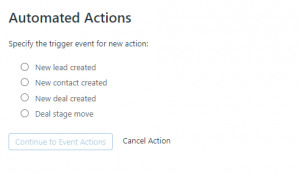
3. As you select the trigger event, click on the Continue to Event Action button.
4. Enter the automated actions that should be executed when the event occurs, such as the Assignment for the leads, contacts, and deals after the events occur and remember to provide the Task name also.
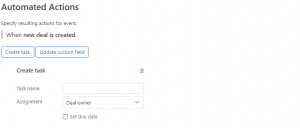
5. Select the Set the due date check box where you can set the time of execution for the automated task, but it is optional.
![]()
6. If you want to create one or more new actions on the single trigger event, click the Create task button.
![]()
7. When all the setup is done, click on the Activate Automated Action button.
Here the automated actions are created and ready for execution. All the actions will be listed on the main page of automated actions, where you can create, update or delete the tasks.
For further queries regarding Automated Actions in Sell, please leave a comment below.


